展开/收起
有一个穷鬼,十分喜欢折腾电脑硬件,可他的父母并不支持他的兴趣爱好,他们认为生为学生就应该心无杂念的一心想着读书。几年过去了,穷鬼的电脑开始渐渐的赶不上时代了,他看了看他的CPU,不由自主地叹了口气:“Pentium E5300…
“ 在他的不懈努力之下,从K 那里抢来了一块Q6600和一块9600GT 又过了几年,又从一个不知名的仓库里拆出了一块Q9300。
Digispark? Digispark是一款类似于Arduino Uno基于Attiny85的微控制器开发板。可用于制作Badusb设备, BadUSB是一种通过重写U盘固件伪装成USB输入设备(键盘,网卡)用于恶意用途的usb设备。杀毒软件由于无法接触到usb固件,所以对它也无可奈何
点个灯 尝试烧写一个示例程序。
1
2
3
4
5
6
7
8
9
10
11
//_因为此开发板有两种类型,并且这两种的LED接的引脚不一样,所以下面的代码中,同时在操作两个引脚。_ void setup() { pinMode(0, OUTPUT); //LED on Model B pinMode(1, OUTPUT); //LED on Model A } void loop() { digitalWrite(0, HIGH); // turn the LED on (HIGH is the voltage level) digitalWrite(1, HIGH); delay(300); // wait for a second digitalWrite(0, LOW); // turn the LED off by making the voltage LOW digitalWrite(1, LOW); delay(300); // wait for a second }
这款开发板比较特殊,先点击下载按钮,当出现如下提示时再插入开发板(而不是插好等下载)
1
2
3
4
项目使用了 718 字节,占用了 (11%) 程序存储空间。最大为 6012 字节。 全局变量使用了9字节的动态内存。 Running Digispark Uploader... Plug in device now... (will timeout in 60 seconds)
这段时间是用来烧写程序的,因为烧写时引导程序需要通过USB接口与计算机沟通,所以这时候计算机才能识别到开发板。5秒后,内部的boot loader会退出烧写模式,并加载用户程序,所以计算机就识别不到它了,并且此时led才能正常闪烁。
展开/收起
1
2
3
4
5
6
7
8
9
10
11
12
13
14
15
16
17
18
19
20
21
22
23
24
25
26
27
28
29
30
Running Digispark Uploader... Plug in device now... (will timeout in 60 seconds) > Please plug in the device ... > Press CTRL+C to terminate the program. > Device is found! connecting: 16% complete connecting: 22% complete connecting: 28% complete connecting: 33% complete > Device has firmware version 2.2 > Device signature: 0x1e930b > Available space for user applications: 6522 bytes > Suggested sleep time between sending pages: 7ms > Whole page count: 102 page size: 64 > Erase function sleep duration: 714ms parsing: 50% complete > Erasing the memory ... erasing: 55% complete erasing: 60% complete erasing: 65% complete >> Eep! Connection to device lost during erase! Not to worry >> This happens on some computers - reconnecting... >> Reconnected! Continuing upload sequence... > Starting to upload ... writing: 70% complete writing: 75% complete writing: 80% complete > Starting the user app ... running: 100% complete >> Micronucleus done. Thank you!
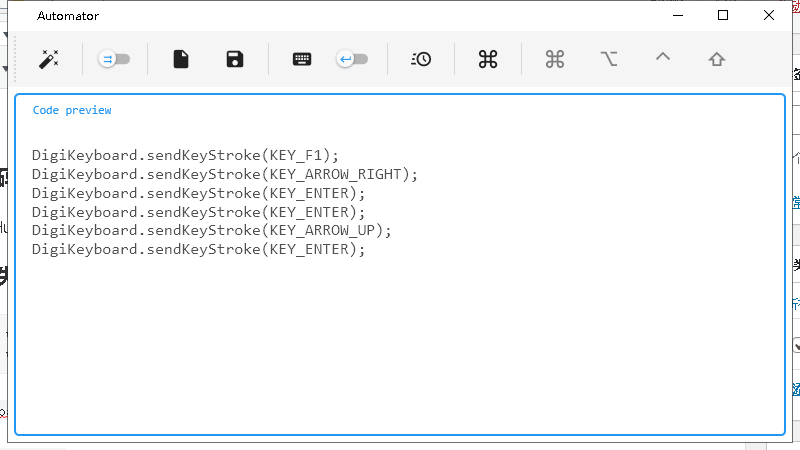
撸代码 在GitHub上有一个为digispark一键生成代码的project > AutoMator
1
2
3
4
5
6
7
8
9
10
11
12
13
14
15
16
17
18
19
20
21
22
23
24
25
26
27
28
29
30
31
32
33
34
35
36
37
38
39
40
41
42
43
44
45
46
47
48
49
50
51
52
53
54
55
56
57
58
59
#include void loop() {} void setup() { DigiKeyboard.sendKeyStroke(0); DigiKeyboard.delay(1000); //START DigiKeyboard.delay(15000); //ENTER BIOS DigiKeyboard.sendKeyStroke(KEY\_F1); DigiKeyboard.delay(1000); //TO ADVANCED DigiKeyboard.sendKeyStroke(KEY\_RIGHT\_ARROW); DigiKeyboard.delay(600); //ENTER JUMPERFREE CONFIGURATION DigiKeyboard.sendKeyStroke(KEY\_ENTER); DigiKeyboard.delay(600); //SET OVERCLOCKING MODE DigiKeyboard.sendKeyStroke(KEY\_ENTER); DigiKeyboard.delay(600); //MANUAL DigiKeyboard.sendKeyStroke(KEY\_UP\_ARROW); DigiKeyboard.delay(600); DigiKeyboard.sendKeyStroke(KEY\_ENTER); DigiKeyboard.delay(600); //TO CPU FREQUENCY DigiKeyboard.sendKeyStroke(KEY\_DOWN\_ARROW); DigiKeyboard.delay(600); //ENTER CPU FREQUENCY DigiKeyboard.print("380"); DigiKeyboard.delay(600); DigiKeyboard.sendKeyStroke(KEY\_ENTER); DigiKeyboard.delay(600); //BACK TO ADVANCED DigiKeyboard.sendKeyStroke(KEY\_ESC); DigiKeyboard.delay(600); //TO CPU CONFIGURATION DigiKeyboard.sendKeyStroke(KEY\_DOWN\_ARROW); DigiKeyboard.delay(600); //ENTER CPU CONFIGURATION DigiKeyboard.sendKeyStroke(KEY\_ENTER); DigiKeyboard.delay(600); //TO C1E SUPPORT DigiKeyboard.sendKeyStroke(KEY\_DOWN\_ARROW); DigiKeyboard.delay(600); //SET C1E SUPPORT DigiKeyboard.sendKeyStroke(KEY\_ENTER); DigiKeyboard.delay(600); //DISABLE C1E SUPPORT DigiKeyboard.sendKeyStroke(KEY\_UP\_ARROW); DigiKeyboard.delay(600); DigiKeyboard.sendKeyStroke(KEY\_ENTER); DigiKeyboard.delay(600); //SAVE && EXIT DigiKeyboard.sendKeyStroke(KEY\_F10); DigiKeyboard.delay(600); DigiKeyboard.sendKeyStroke(KEY\_ENTER); }
编译失败了 1 2 const unsigned char ascii\_to\_scan\_code\_table \[119\]' previously defined here const unsigned char ascii\_to\_scan\_code\_table\[\] PROGMEM = {
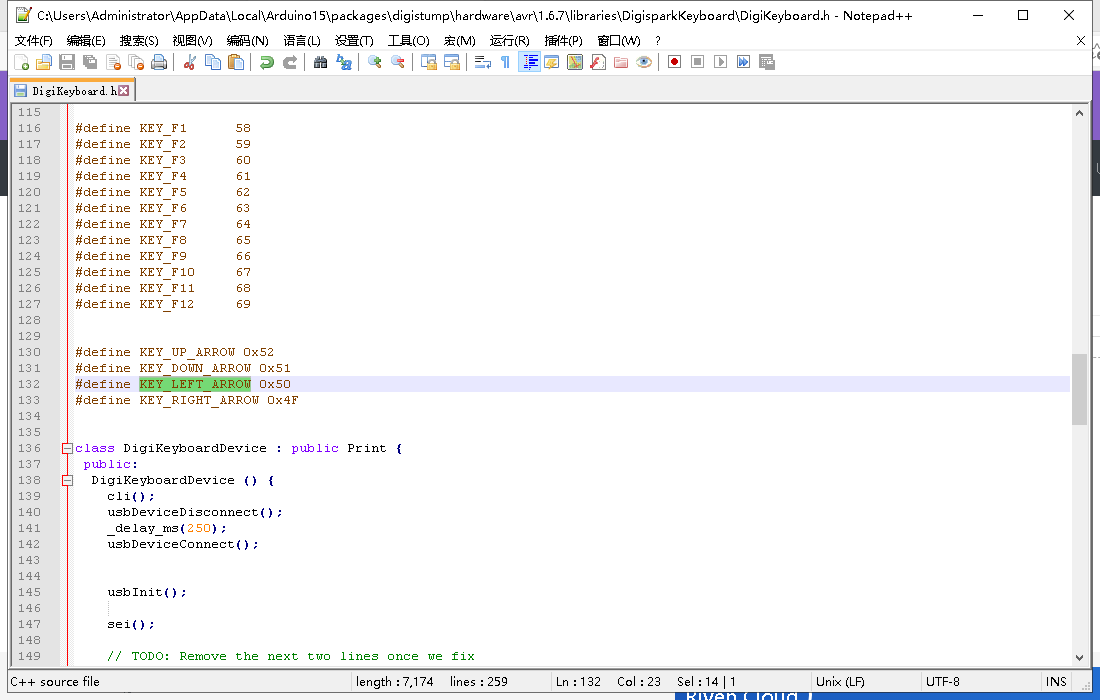
这个错误由digispark.h中键位表不全所致。代码中如出现KEY_RIGHT_ARROW等未定义的键时会导致编译出错。 在digispark.h中补全键位表即可
1 2 3 4 5 #define KEY\_UP\_ARROW 0x52 #define KEY\_DOWN\_ARROW 0x51 #define KEY\_LEFT\_ARROW 0x50 #define KEY\_RIGHT\_ARROW 0x4F #define KEY\_ESC 0x29
怎么没反应🧐 好欸,BIOS认digispark是个键盘了 等 再等 再等等 并没有反应 在digispark论坛中,很多人反应digispark模拟的hid键盘并不能在BIOS中使用 https://digistump.com/board/index.php?topic=1096.0 https://digistump.com/board/index.php?topic=2922.0 有大佬提出通过替换digispark.h和usbconfig.h文件可以解决这个问题https://github.com/bkgarry/DigikeyboardBIOS
These two files (DigiKeyboard.h and usbconfig.h) replace the original digikeyboard files in the following windows directory.%localappdata%\\Arduino15\\packages\\digistump\\hardware\\avr\\1.6.7\\libraries\\DigisparkKeyboard
%localappdata% is the environmental variable to take you to your user’s local appdata so the path will work.
Once these files have been replaced, recompile your existing code to your digispark and you will be able to use the same script to run your keyboard commands within a system BIOS)
Working🤗